
Achieving Behavioral Personalization (AKA XP Pattern/Profile Cards) with Sitecore Personalize
AI-Assisted Proofreading
All articles on this site are written by me. I use AI tools solely for proofreading and editing assistance to ensure clarity and accuracy.
Hello Friends, back at it today, introducing a popular topic that the Sitecore community has expressed specific interest to me, multiple times in the past. The community assumes you can’t achieve XP pattern/profile card functionally with XM Cloud (or any CMS) and Sitecore Personalize. Recently I worked on an internal project at Sitecore that involved AI and for our team, involved Sitecore Personalize. For this project, I built a replica of Pattern/Profile cards (Behavioral Personalization) and as soon as I got it working I wanted to share this implementation with the community.
First, I mentioned XM Cloud above, but the CMS system that you use, doesn’t matter here, you’ll just need a system of truth to either provide your scoring of the content as well as a single source of truth for the Personas that you want to match with. I will not cover this part too much with this blog post, except showing how I did it for the POC that works with the Developer Portal which uses Grey Matter which is content managed by code, instead of a SaaS CMS solution. So this approach will likely not apply to everyone, but I hope to also add this functionality and iterate on it for integration with my website.
I’ve always considered doing this blog post as three different flavors or ways to achieve this kind of functionality, but instead of holding on to all these techniques, I figured I should instead mention the strategies and then show the most XP way to achieve this approach, and all the code you need to achieve it. I do plan to include this in an examples repository that is easier to deploy, coming soon (using the serializer tool). I also hope to complete code samples for the other approaches as well. If you have ideas for other strategies to achieve behavioral personalization, please let me know through one of my social channels.
Three Strategies
All three strategies start with the concept of tagging your content and then capturing that additional metadata with your CDP software (aka Sitecore CDP or Personalize). In some cases, the three strategies will have different data you might want to collect to achieve different forms of behavioral personalization.
Taxonomy Strategy
Honestly, this is the simplest strategy, where you will want to tag your current content with tags or various taxonomies to help describe what kind of content is on this page. This allows Sitecore Personalize decision model to pull that data, and determine what is the most relevant next best action based on the content and those taxonomies that the user is currently looking at. So for example, if the user visited pages on XM Cloud and Personalize based on the taxonomy applied to characterize those pages they were looking at, we can assume that the user may be trying to learn more about Sitecore XM Cloud and Personalize.
As I just mentioned, in your decision model, you would have logic to pull from the guest’s sessions, the event arbitrary data that they collected while navigating your website. In this post: “Capturing Additional Data in a View Event in Sitecore CDP/Personalize (dylanyoung.dev)”, I discussed how you could log to the VIEW event with additional arbitrary data about the user or really about the page that they are viewing.
Using Patterns and Personas
This strategy is the most like XP Pattern/Profile cards and the method I will be talking about today and a step up above the taxonomy strategy since it just provides a richer data scoring mechanism for the pages on your website. It’s about the concept of going a step further when tagging your pages, and instead of describing them with taxonomy, you’ll want to flag the page with profile keys (the XP term) or just have attributes that you use to describe your Personas and then use those same attributes to describe your page content. It’s also a little different than taxonomies because, taxonomies just describe the content, whereas profile keys are used to help identify the persona of the user based on the types of pages they are viewing. So instead of saying okay, this page about marketing, is about marketing, you’ll want to score the page instead towards specific attributes. So for example, for our project, we might have a Persona for a “Marketer/Strategist” and another for a “Builder/Developer” and we might have attributes for each persona that would be scored differently depending on the “Persona” that a website visitor/anonymous user might fit into. For example, consider the following tables and the different attributes assigned to each persona.
Sally the Super Savvy Marketer
| Keys | Score |
|---|---|
| Backend Skills | 0 |
| Frontend Skills | 2 |
| Marketing Skills | 10 |
Fred the Frontend Developer
| Keys | Score |
|---|---|
| Backend Skills | 5 |
| Frontend Skills | 10 |
| Marketing Skills | 2 |
If you want to learn more about this approach, you are in luck, in the next section I will walk through this approach in depth, including how we scored the pages, and then the logic in our decision model and the algorithm that we used to calculate the N-Dimensional Euclidean Distance, to essentially calculate which Persona was the closest distance to all the content that had been scored by the pages the user has looked at.
Using AI
This is likely the most advanced way of achieving 1:1 behavioral personalization, where you connect to an AI model in your Sitecore Personalize decision model, pass it data about the user and what they’ve been looking at on your website and then have it decide what the user is most likely looking for or what their intent is on your website. Whereas the taxonomy or pattern matching approach, is just an algorithm, with a self-designed and trained AI model, you could have more specific control over when persona A or persona B would be the matching persona. Or you could break down personas into micro personas based on very specific criteria. For today’s blog post, I will not be covering this topic, however, with my love for AI, I may come back and cover this topic in a future blog post.
Walkthrough the Steps to Get Pattern Card Matching in Sitecore Personalize
Alright so let’s take a look at the actual implementation that the DevRel team at Sitecore completed internally for achieving Patterns and Personas with Sitecore Personalize. Now I didn’t mention this before, but the very first task in this process, is discussing and identifying your site’s Personas, without this, it’ll be challenging to gain much value out of these tasks. Now for our POC (Proof of Concept) project, we had some very rudimentary Personas, called Fred and Sally, and one was a Frontend Developer while Sally was the Marketer. There were three attributes that I used to focus on grouping a user into one of the personas, which were:
- Front End Skills
- Back End Skills
- Marketing Skills
These are not great attributes, but they helped serve our POC purposes on this project. If you refer to the two tables above, you can see how these attributes were scored differently from the personas. Then conversely, we would also score pages with those same scores where appropriate.
Tagging the Pages
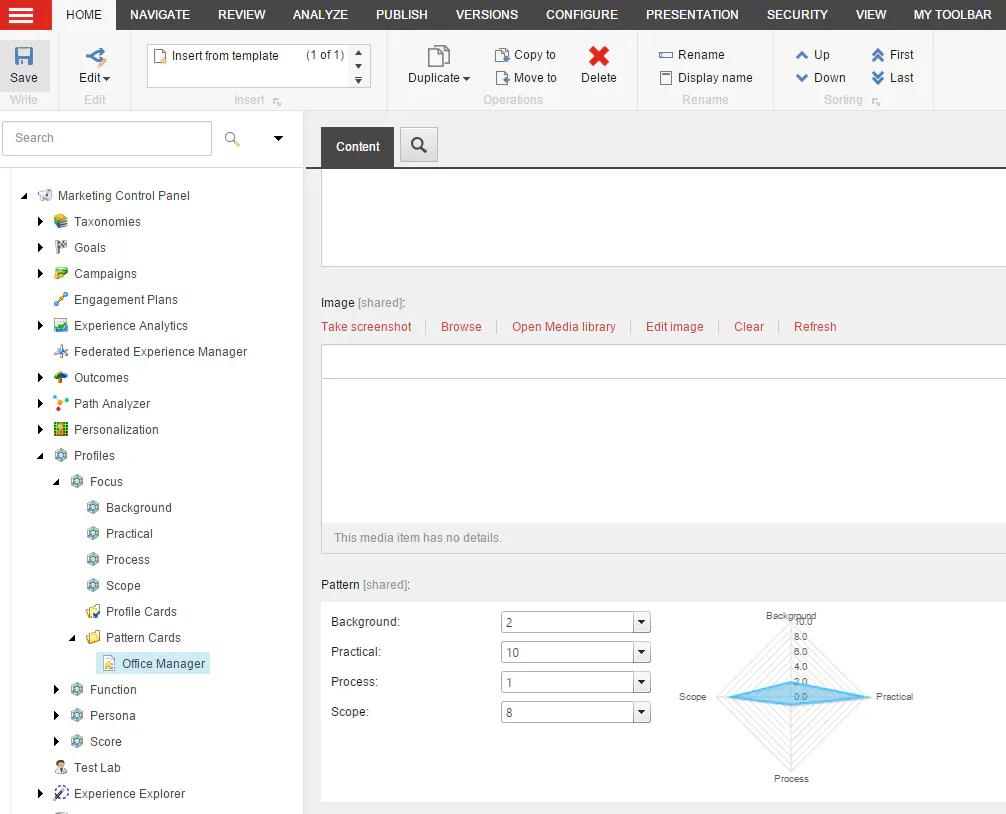
As mentioned under the strategies, the most important initial step is to identify and tag the pages, now this exercise usually was more involved when I worked at agencies in the past, by spending time with the customer and UX/Strategy to properly identify the persona to the pages. In the world of XP, you would first need to define a Profile, and then define Profile Keys (aka attributes), and then you could define Pattern Cards which were essentially the Persona that a user would be assigned to after a certain number of visits and then there was also Profile Cards. Profile Cards you would assign to the pages or you could assign Profile Keys manually also to the page.
For this example, I went with just the manual process of tagging pages with attribute scores (Profile Keys), but theoretically, the configuration of the tagging of the pages, could be done however you would like to. I do plan to create a way to tag a Page to a Profile Card (which would have the predefined Profile Keys, so it’s easier for someone to assign scores to a page in the future) at some point in the future, but this approach works for now.
Our site “Developer Portal”, like I mentioned before uses Frontmatter, which is a way to pass attributes to a markdown page to then be turned into content in the future. I added the Profile Keys/Behavioral attributes like this:
1cdpPersonaDefinition:2 { PagePattern: [3 { 'ProfileKey': 'FrontendSkills', 'value': 1 },4 { 'ProfileKey': 'BackendSkills', 'value': 1 },5 { 'ProfileKey': 'MarketingSkills', 'value': 10 }6 ] }
So as you can see this page, is the Sitecore Personalize page, so I’m saying here that this page is more targeted towards the Marketer than a developer. Now obviously this is just an example, and in reality, a developer visiting the Sitecore Personalize page on the developer portal, isn’t likely to be only a marketer, but if we had a page that maybe talked more about the business value of the product that this might stand true in that scenario.
Collect Page Details with Engage SDK
With the tagging of additional attributes to our content, now let’s take a look at how we can start consuming this content. In a previous blog post Capturing Additional Data in a View Event in Sitecore CDP/Personalize (dylanyoung.dev), I talked about how you can consume additional arbitraryData alongside different events, this specific scenario is no different, and we’ll use the Engage SDK to consume these additional attributes. Now how it was done on the Developer Portal is specific to that site, but what we need is a way to send this data on the page. One option for that is to wrap the _app component that is used for every page or the page itself in a component that will track this data to the Engage SDK. Here is an example of wrapping your page with a component:
1const Home: NextPage<HomePageProps> = () => {2 return (3 <TrackPageView slug="/" cdpPersonaDefinition="{Some JSON Data Here}">4 <Layout>5 <Heading>Welcome</Heading>6 <Text>You made it!</Text>7 </Layout>8 </TrackEvent>9 )10}
You can then pass the CDP persona definition keys to the Track Event which will then store that data into Personalize using the Engage SDK:
1import { INestedObject } from '@sitecore/engage/types/lib/utils/flatten-object';2import { FC, useEffect } from 'react';3import { useEngageTracker } from './useEngageTracker';45interface TrackPageViewProps {6 slug: string;7 children: React.ReactNode;8 cdpPersonaDefinition: string;9}1011export const TrackPageView: FC<TrackPageViewProps> = (props) => {12 const engageTracker = useEngageTracker();1314 useEffect(() => {15 if (engageTracker && engageTracker.context.isTrackerEnabled) {16 engageTracker.TrackPageView(props.slug, props.cdpPersonaDefinition);17 }18 }, [engageTracker, engageTracker.context.isTrackerEnabled);1920 return <>{props.children}</>21};
This isn’t an exact replication of how I have it created for our POC for the developer portal, but it shows a simple example of how you could tie into the Engage SDK. Lastly, you’ll need to call Track Page View, which looks something like this:
1const TrackPageView = async (pageSlug: string, cdpPersonaDefinition: INestedObject | undefined) => {2 if (!context.isTrackerEnabled) return;34 if (!context.engageTracker) {5 console.log("Engage tracker is not initialized or you haven't wrapped your app with <EngageProvider>.");6 return;7 }89 const pageViewData: IPageViewEventInput = {10 channel: 'WEB',11 currency: 'USD',12 pointOfSale: 'point_of_sale',13 language: 'EN',14 page: pageSlug15 };1617 await context.engageTracker.pageView(pageViewData, cdpPersonaDefinition);18 };
A lot of this Engage Tracker code is coming from an examples repo that I’m working on, I’ve released the Vite with React/Typescript example, that you can refer to, to better understand the context around the examples above: GitHub - dylanyoung-dev/sitecore-engage-sdk-examples: This repository shows multiple different ways to implement the Engage SDK.
That is a rough idea of how the code would be written to get the code added to each page with its own persona key data definitions, into Sitecore CDP or Personalize.
Pull Data from Guest Context in a Decision Model Programmable
Now that we have the arbitrary profile keys per page view in our system, now let’s start by taking a look at our Decision Model. We will need to extract from the guest session, all the events, and target the specific events that are View events, so then we can collect this arbitrary data if it is present. To do this, I wrote the following code to achieve this:
1(function() {2 var result = {};3 var products = [];4 var tags = [];5 var patterns = [];6 var totalData = 0;7 var foundAllData = false;89 for (var s = 0; s < guest.sessions.length && !foundAllData; s++) {10 var session = guest.sessions[s];1112 for (var e = 0; e < session.events.length; e++) {13 var event = session.events[e];1415 if (event.type === 'VIEW' && event.arbitraryData.ext) {16 totalData += 1;1718 if (event.arbitraryData.ext.patternCards_PagePattern) {19 patterns.push(event.arbitraryData.ext.patternCards_PagePattern);20 }21 }2223 if (totalData >= 30) {24 foundAllData = true;25 break;26 }27 }28 }2930 result = {31 products: products,32 tags: tags,33 patterns: patterns34 };3536 print("Get Page View Data - Line 39: " + JSON.stringify(result));3738 return result;39})();
Key details about the code above are that we only pull the last 30 events that have the type of data that we are looking for. Ideally, I would move this into a JS Module as a function, or even a Decision Template and take the input as parameters, so the function stays the same, but the parameters could change. Once I complete adding these to the templates, that is likely how you might find that configured, when I add this code to an example repository. But if you want to use data from more events or less, just change this line of code and increase or decrease the limit for totalData:
1if (totalData >= 30) {2 foundAllData = true;3 break;4}
A few other things of note from the code sample above are depending on how you stored data in the arbitraryData object, it would vary your ext.properties setting. This project was a POC, and ideally, I might of spent a little more time, making sure the attributes came in appropriately.
Constants Programmable
Once we have the data, we can then use it to make a decision. In our case, we need additional data in the Decision model, which contains the pattern-matching data. For example, we need to know the different patterns and the scores that match that pattern based on the prior table from above about Sally vs Fred. We will then use that information in another programmable to match with a closest distance calculation, which we’ll cover next.
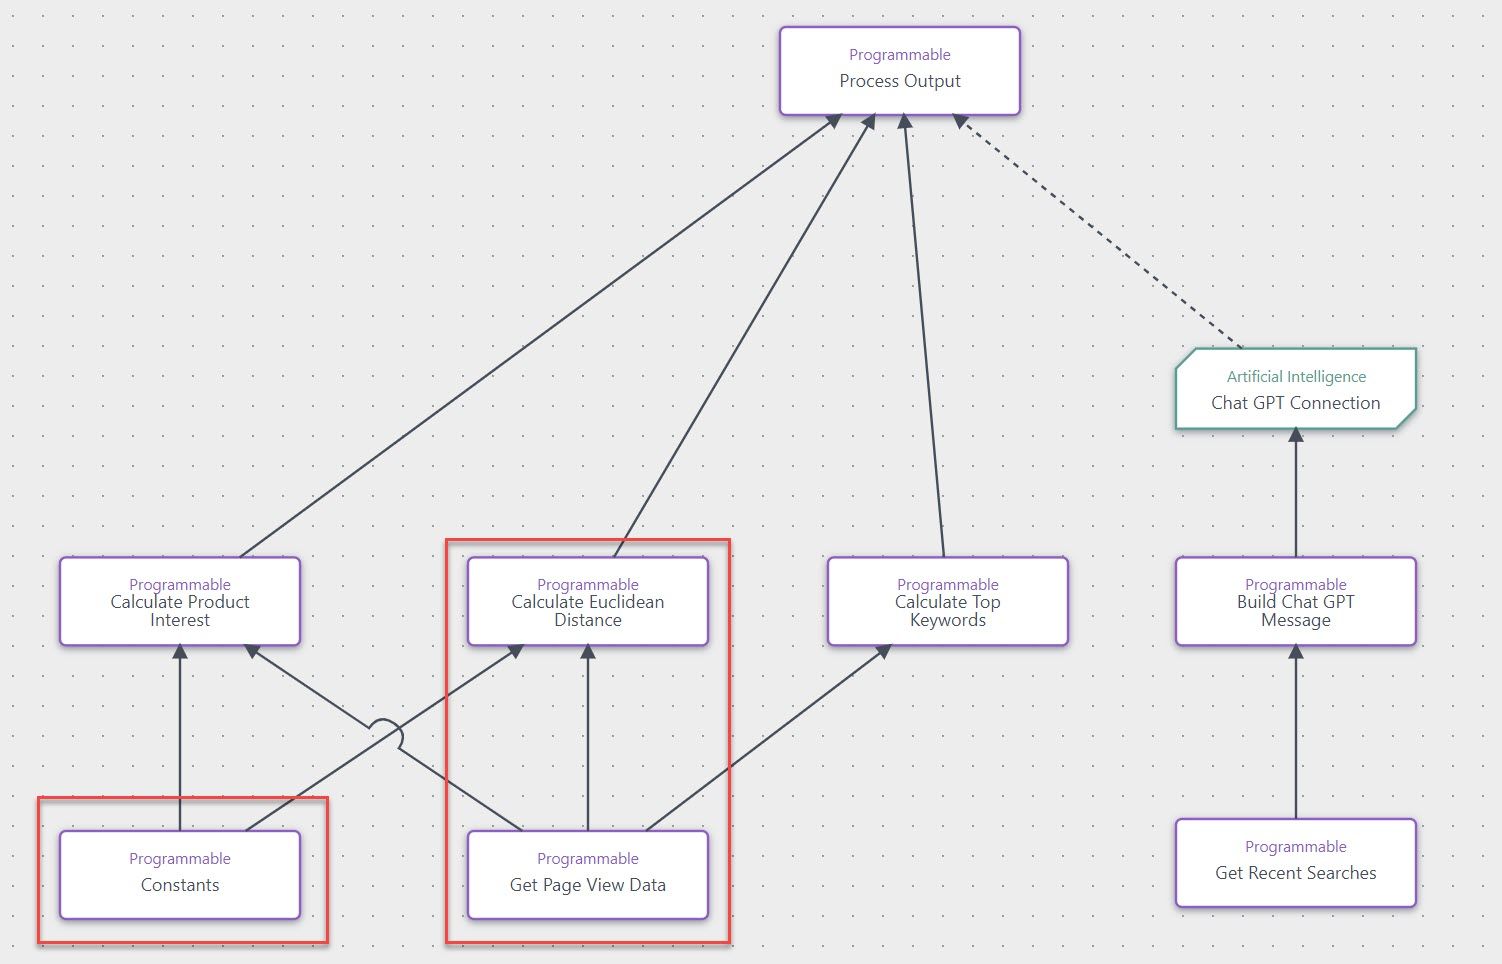
Our decision model looks like the diagram below, which contains a little more than the topic we are discussing today, but only focus on the highlighted red boxes, this is what we are recreating in our decision model:
Our programmable for the Constants block looks like the following:
1(function () {2 var personaData = [ { Id: 'fredPersona', Name: 'Fred', PersonaKeys: [ { ProfileKey: 'FrontendSkills', value: 10, }, { ProfileKey: 'BackendSkills', value: 1, }, { ProfileKey: 'DesignSkills', value: 5, }, { ProfileKey: 'MarketingSkills', value: 1, }, ], }, { Id: 'sallyPersona', Name: 'Sally', PersonaKeys: [ { ProfileKey: 'FrontendSkills', value: 2, }, { ProfileKey: 'BackendSkills', value: 1, }, { ProfileKey: 'DesignSkills', value: 3, }, { ProfileKey: 'MarketingSkills', value: 10, }, ], } ]34 return personaData;5})();
All this code does is create a JSON object that we’ll use later in our N-Dimension Euclidean Distance. This was done like this, in our case, because we defined some other JSON objects in addition to the persona information, but we could’ve stored this actually inside our programmable for calculating the distance, or probably a better option would be to store this in our CMS system or some other system so that it’s 1) easier for content editors to change this configuration and then 2) we wouldn’t duplicate some of the persona information, since our site also defines an object for the different personas. We store in the site, attributes that we later use on the site to personalize the experience, as Sally the Marketer would be more interested in high-level “why” explanations, while a developer would be more concerned with how to implement whatever they are researching on the Developer portal. But we’ll cover this further in a future article/video. For now, let’s not get too distracted on how this mechanism could be used on your site, but rather by how this strategy is implemented.
Once we have that JSON object, we pass it on to the Euclidean Distance calculation, which will use that information to calculate from the events the closest matching persona.
Calculating N-Dimensional Euclidean Distance
So now that we have the data or events from the page views that the user has visited and we also know what data attributes or profile key values make up a persona, we can proceed with an Euclidean Distance calculation.
The N-Dimensional Euclidean distance is a mathematical concept used to measure the distance between two points in a multi-dimensional space. It is based on the Pythagorean theorem, which calculates the shortest distance between two points in a two-dimensional space. The N-Dimensional Euclidean distance extends this concept to spaces with more than two dimensions. It measures the straight-line distance between two points in a space with multiple attributes or dimensions, taking into account the differences in each attribute. This distance can be used to compare and classify data points based on their similarity or dissimilarity in a multi-dimensional space.
It's like measuring the straight-line distance between two points in a space with multiple fruit characteristics, considering the differences in each attribute. This distance can help us compare and classify fruits based on their similarities or differences in a multi-dimensional space.
Honestly, it’s a complex algorithm, and it’s fun to say, to impress your friends or colleagues at conferences, but it’s a pretty useful algorithm that has many applications beyond the use case that we are using today. The N-Dimensional Euclidean Distance calculation, used in behavioral personalization, shares similarities with vector databases and Generative AI in terms of similarity measurement and searching. Vector databases store vectorized representations of data, such as text, based on their relationships with other data points. Similarly, the N-Dimensional Euclidean Distance measures the similarity or dissimilarity between two points in a multi-dimensional space, considering the differences in each attribute. This calculation can be applied in various contexts, including Generative AI and vector searching, to compare and classify data points based on their multi-dimensional characteristics.
Let’s peek under the covers and explore how we are handling this calculation in our programmable. I must admit it still doesn’t quite calculate the same as Sitecore XP, it still needs some work, so keep that in mind when reusing the code on your own project (since this was simply a POC). It does a solid job and will match up very nicely with either Fred or Sally depending on the scoring of the pages they visited.
1(function () {2 const data = data_mapping;3 const metaData = meta_page_view_data;45 print(metaData.patterns);67 // Calculate the average values for each ProfileKey8 var averageValues = {};9 var totalCount = metaData.length;1011 metaData.patterns.forEach(function (patterns) {12 patterns.forEach(function (pattern) {13 if (!averageValues[pattern.ProfileKey]) {14 averageValues[pattern.ProfileKey] = { value: 0, count: 0 };15 }16 averageValues[pattern.ProfileKey].value += pattern.value;17 averageValues[pattern.ProfileKey].count += 1;18 });19 });2021 var averagePatterns = Object.keys(averageValues).map(function (key) {22 return { ProfileKey: key, value: averageValues[key].value / averageValues[key].count };23 });2425 var closestDistance = Infinity;26 var closestPersona = null;2728 data.personaData.forEach(function (persona) {29 var distance = euclideanDistance(persona.PersonaKeys, averagePatterns);30 if (distance < closestDistance) {31 closestDistance = distance;32 closestPersona = persona.Id;33 }34 });3536 print("Calculate Euclidean Distance - Line 17:" + closestPersona);3738 return closestPersona;39})();4041function euclideanDistance(personaKeys, inputValues) {42 var distance = 0;43 personaKeys.forEach(function (key) {44 inputValues.forEach(function (val) {45 if (key.ProfileKey === val.ProfileKey) {46 distance += Math.pow(key.value - val.value, 2);47 }48 });49 });50 return Math.sqrt(distance);51}
In a future blog post I’ll spend a little more time breaking down this code, but to keep it short and sweet, this code achieves the distance calculation and depending on the distances found, will determine the persona.Id for the persona that is the closest distance using the algorithm.
Run an Experience using the Decision Model
Once you have all the programmables built out, you’ll now need to define the Experience or Experiment that will run the decision model and return a result. You have a couple of options here, such as creating a Web Experience/Experiment, where you would define the elements that would change based on those decisions on your website, but for this implementation, I used a Full Stack Interactive Experience, which I don’t see covered very often in the community, but it’s value is also very useful. In our use case, we wanted to return the matched Persona in specific areas, such as even in an app that runs after the first load of the application so that the decision model would have even more useful information. Now obviously, for our specific use case, we only collected data from each page view, so either approach (Web or Full Stack) will work here. A full stack experience can also be extremely helpful in returning a decision and then pulling specific content, such as in a Next.js Middleware or just loading the personalized content server side to return to the server. But specifics of why a Full Stack Interactive Experience is a helpful tool, will have to be explored further in a future blog post.
So to create a Full Stack Interactive Experience, it’s quite easy, just navigate to that page in your Personalize tenant (ie. /experiences/full-stack/list?orderedBy=last%20updated&type=INTERACTIVE_API_FLOW§ion=all). The type can switch it to a Triggered which is something else entirely. Our Full Stack Interactive Experience looks like the following:

We have a few things going on here in our Experience, first is the API Response area, which we will take a closer look at in a moment, it basically takes the result of our decision model and then converts that into a valid JSON object which when this interactive experience is called into, that will be the result of the API request. And then under the Decisioning section, I am assigning it the decision model that I walked us through the programmables needed to collect and then determine the closest persona.
The code for the API response looks like the following:
1${decisionModelResults.decisionModelResultNodes[8].outputs[0].result}
All this is doing, is taking the result, in our case from another programmable that I didn’t cover, which builds us a JSON object for this step, since there are multiple pieces of information that we need to combine into one result here. We are referencing decisionModelResultNodes[8] which is taken from our decision model, the result from the 8th node in the array of decision model nodes.
Triggering the Full Stack Interactive Experience from the Engage SDK
The very last step is that we need to trigger from our code, the interactive experience, so that we can say, “Hey CDP, can you make a decision for us”. This will then call into our Interactive Experience and using data from the session and past sessions using the decision model, it’ll return a result (we could also send the interactive experience data, but that’s for another blog post).
Here is what our code might look like to run that experience. It’ll take either the Experience Id or the friendly name.
1const RunPersonalizationFlow = async <T,>(friendlyId: string, data?: INestedObject | undefined): Promise<T | undefined> => {2 if (!context.isTrackerEnabled) return;34 if (!context.engageTracker === undefined) {5 console.log('engageTracker is undefined');6 return;7 }89 const personalizationData: IPersonalizerInput = {10 channel: 'WEB',11 currency: 'USD',12 friendlyId,13 pointOfSale: configuration.SitecoreCdpPointOfSale14 };1516 if (data) {17 personalizationData.params = data;18 }1920 const response = await context.engageTracker?.personalize(personalizationData, 10000);2122 return response as T;23 };
In our code we are using the friendly Id. This will then return the JSON object from our Experience that we have defined above. And that’s it. You can now create behavioral personalization results on any site type you want, including XM Cloud.
Wrap Up
And that’s all folks. As previously mentioned in the beginning, I’ll be working on converting some of these items into an example repository, so with the use of the serializer tool that I built last year, you can start using something like this in your own Sitecore Personalize tenant. Just be aware however, that this all starts with your ability to start classifying your content on your site, either with the taxonomy approach or using the more sophisticated approach of scoring your pages to specific profile keys, like you would do with Sitecore XP Pattern and Profile Cards.